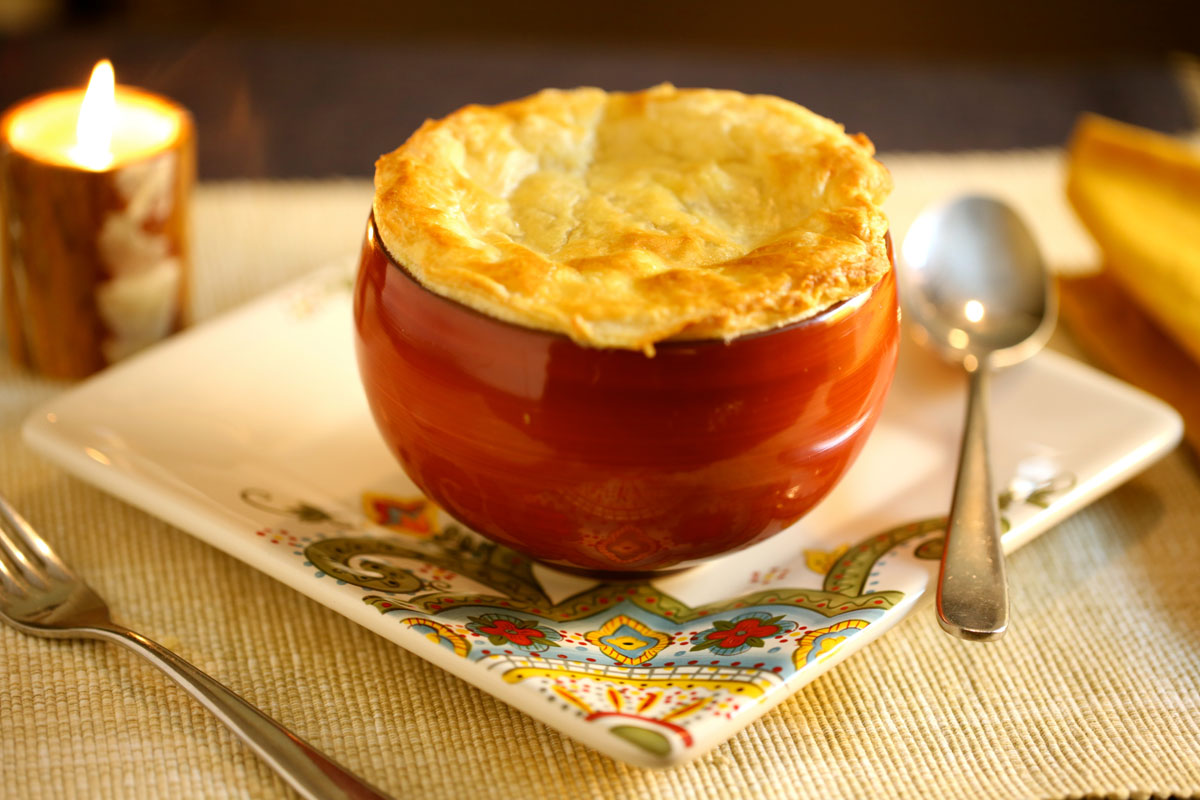
Chicken Pot Pie
Servings
6 servings
Active Time
1 hour
Total Time
2 hours
| Share on Facebook |
| Share on Twitter |
| Download the Recipe |
Chicken Pot Pie
“Comfort me, Seymour!” That’s how the quote goes, right? No? Well, it should be. It’s how I feel about this dish. If you’re on the market for soul-satisfying comfort that is sure to result in you in sweat pants on the couch with a dumb grin on your face, then please proceed, friend. The individual portions ensure that everyone gets tons of crispy crust!
Ingredients
- 2.5 lbs boneless, skinless chicken breast or thighs or mix
- 8 cups chix stock
- 2 cups white wine
- 1 cup half and half
- 6 tbsp butter
- 6 tbsp AP flour
- 2 medium carrots
- 3 stalks of celery
- 1 pkg frozen green peas
- 1 onion
- 2 cloves garlic
- 2 tbsp thyme or sage (dealer’s choice, they’re both good)
- A box of puff pastry
- Salt & Pepper to taste
Optional add-ins:
- 1 can of kernel corn
- 1 head of broccoli, cut into very small florets
Directions
Let me preface this by saying that this recipe will produce individual “pot pies” for your diners in bowls as opposed to a large pie. I prefer to do it this way because I am obsessed with a crispy crust and I find that unless you execute it perfectly, doing it the old fashioned way leaves you with more sogginess than crispiness. If you were on the hunt for a traditional pie style chicken pot pie recipe, keep walking pal.
1. Dice the onion and the mince the garlic, set aside for use in a few steps.
2. Using kitchen shears, trim the chicken breasts and/or thighs down to 1.5 in cubes, trimming away excess fat and any bones or cartilage your local butcher may have missed (mine misses a lot).
3. Over a high flame, pre-heat your favorite soup pot to prepare to sear the chicken pieces. You will likely need to separate the chicken into two batches.
4. Once you have a solid sear on at least one side of the chicken (not looking to fully cook it, just get a little brown on there for flavor), take chicken out of the pot and set aside.
5. With the remaining oil from the searing still left in the pot, reduce heat to medium and saute the onions. After a couple minutes have passed, add the garlic and stir constantly. After 30 seconds, add the butter and melt alongside the onions and garlic.
6. Stirring the flour/butter/onion/garlic mixture fairly frequently, let the flour cook until it turns golden brown and/or “rust” in color.
7. At this point, whisk in the white wine and stir constantly. You’ll want to scrape any brown bits on the bottom of the pan at this point. The wine will thicken very quickly so keep it moving as to not burn anything. Turn the heat down if you have to, no stress needed in this kitchen!
8. Once the pan has been deglazed and the wine is well incorporated, slowly whisk in the chicken stock and the thyme or sage. Bring it to boil and let boil for about 4 or 5 minutes. This will kick start your flour and help thicken the stew. Add the chicken, reduce heat to low and put a lid on the pot. Let simmer for 45 minutes.
9. While the stew is doing its thing on the stove, it’s time to focus on the veggies. Wash and peel the two carrots and cut the very tips off of either end. I usually cut thin rings until I get towards the last “quarter,” of the carrot where it gets really fat and then chop it in half length-wise and then cut half-circles. For the celery, give the stalks a good rinse in the sink and then trim off the ends of each stalk. Cut the celery in half and then chop into squares. If you’ve decided to go with the broccoli and/or corn or both, pop open a can of corn and drain the liquid (going with fresh for a stew is not worth the trouble, trust me) and trim the broccoli so that the florets are quite small. How small? Think about eating it in the context of a spoonful of stew and take it from there.
10-A. After 45 minutes of simmering, pop the lid off and let the liquid reduce for about 15 minutes more and then add in all of your vegetables, minus the peas. Cover the pot again and let cook for 20 minutes.
10-B. At the same time you are doing 10-A, go ahead and preheat your oven to 400 and take your puff pastry out of the freezer to thaw. Specifically, the puff pastry will need about 30 minutes at room temperature to become usable, but then there’s only around a 20 minute window where it becomes too thawed and is sticky and becomes a total pain to work with.
11-A. At this point, you are around 10 minutes away from the stew being done and so it’s time to bake the pastry. Lay out the puff pastry on a large flat surface. Using the bowl you intend to scoop the stew into, place directly on the pastry and use a paring knife to cut out circles using the bowl as a guide. Repeat this for as many people as you intend to serve. Lay out the circles onto a well greased baking sheet (SILPATs are amazing for this) and bake for about 15 minutes, rotating the baking sheet 180 degrees half way through. Defer to the cooking directions on whichever puff pastry you bought or more importantly, use your eyes. If it looks golden brown, crusty and delicious, they’re probably done. Take out of the oven and let cool until they are safe to handle.
11-B. When you put the pastry into the oven, you should also put the peas and half and half into the stew pot and let cook for 10 minutes. Do not let the heat come back to a boil, just a gentle simmer now that the half and half is in. At this point, all of the veggies and chicken should be tender. Do a final taste test and address any adjustments that it may need. Turn off the heat.
12. Scoop the stew into bowls and top with a pastry round just prior to serving. Alternatively, you can place the pastry rounds in the bottom of the bowl and spoon the soup over it, which can also be a great way to serve this dish making it similar to biscuits and gravy. However, if you do it this way, serve the soup table side so that the pastry does not get too soggy prior to eating.